This tutorial will show you how to create a hidden Div and display it with the click of a link. There are a few reasons you may want to hide a Div in a website design. You may want to create a drop down type menu or a box that will show more information when you click a link. Another reason would be for SEO purposes. In theory hiding information in a Div is not against Google’s rules. As long as the user can still see the content when clicking a button you are not displaying different information to the user than you are to the search engine.
First we are going to start with a very basic page layout and create a 2 Divs. One will be shown and one will be hidden. Here is the starting code.
<!DOCTYPE html PUBLIC "-//W3C//DTD XHTML 1.0 Transitional//EN" "http://www.w3.org/TR/xhtml1/DTD/xhtml1-transitional.dtd">
<html xmlns="http://www.w3.org/1999/xhtml">
<head>
<title>Hidden Div</title>
</head>

<body>
<div id="main">This is not hidden.</div>

<div id="hidden">This is hidden.</div>


</body>
</html>

Ok now I will add some basic style to these boxes.
<!DOCTYPE html PUBLIC "-//W3C//DTD XHTML 1.0 Transitional//EN" "http://www.w3.org/TR/xhtml1/DTD/xhtml1-transitional.dtd">
<html xmlns="http://www.w3.org/1999/xhtml">
<head>
<title>Hidden Div</title>

<style type="text/css">
<!--
#main{
	width:500px;
	height: 20px;
	background: lightblue;
}
#hidden {
	width:300px;
	height:20px;
	background: lightgrey;
}
-->
</style>


</head>

<body>
<div id="main">This is not hidden.</div>

<div id="hidden">This is hidden.</div>


</body>
</html>
The page should look like this so far.

Now to hide the div. To do this we will change the display to none in the CSS for the #hidden div. See the code below.
<!DOCTYPE html PUBLIC "-//W3C//DTD XHTML 1.0 Transitional//EN" "http://www.w3.org/TR/xhtml1/DTD/xhtml1-transitional.dtd">
<html xmlns="http://www.w3.org/1999/xhtml">
<head>
<title>Hidden Div</title>

<style type="text/css">
<!--
#main{
	width:500px;
	height: 20px;
	background: lightblue;
}
#hidden {
	width:300px;
	height:20px;
	background: lightgrey;
	display: none;
}
-->
</style>


</head>

<body>
<div id="main">This is not hidden.</div>

<div id="hidden">This is hidden.</div>


</body>
</html>
Now when you preview the page you will not see the Div.

In order to show the div we will need to add a Javascript function. We will pass the ID attribute of the Div to the function. Basically this means that we can use this one function to show or hide more than one Div on the same page. Below is the Javascript code that we will add the the Head section of the page.
<script language="JavaScript">
	function toggle(id) {
		var state = document.getElementById(id).style.display;
			if (state == 'block') {
				document.getElementById(id).style.display = 'none';
			} else {
				document.getElementById(id).style.display = 'block';
			}
		}
</script>
The script above is creating the function “toggle” an passing the value “id”. Next we are using the Document Object Model to get the current state of the display attribute. Then if “display: block;” for the #hidden div we will change it to be “display: none;” else we will change the display to none.
Add the code to your page in the head just below the style.
<!DOCTYPE html PUBLIC "-//W3C//DTD XHTML 1.0 Transitional//EN" "http://www.w3.org/TR/xhtml1/DTD/xhtml1-transitional.dtd">
<html xmlns="http://www.w3.org/1999/xhtml">
<head>
<title>Hidden Div</title>

<style type="text/css">
<!--
#main{
	width:500px;
	height: 20px;
	background: lightblue;
}
#hidden {
	width:300px;
	height:20px;
	background: lightgrey;
	display: none;
}
-->
</style>

<script language="JavaScript">
	function toggle(id) {
		var state = document.getElementById(id).style.display;
			if (state == 'block') {
				document.getElementById(id).style.display = 'none';
			} else {
				document.getElementById(id).style.display = 'block';
			}
		}
</script>


</head>

<body>
<div id="main">This is not hidden.</div>

<div id="hidden">This is hidden.</div>


</body>
</html>
Now all we have to do is create a link that will call the toggle function and pass the ID of the Div we want to toggle. We will create a link that goes no where and add the onclick property below.
<a href="#" onclick="toggle('hidden');">Toggle Div</a>
Add the link to your visible div.
<!DOCTYPE html PUBLIC "-//W3C//DTD XHTML 1.0 Transitional//EN" "http://www.w3.org/TR/xhtml1/DTD/xhtml1-transitional.dtd">
<html xmlns="http://www.w3.org/1999/xhtml">
<head>
<title>Hidden Div</title>

<style type="text/css">
<!--
#main{
	width:500px;
	height: 20px;
	background: lightblue;
}
#hidden {
	width:300px;
	height:20px;
	background: lightgrey;
	display: none;
}
-->
</style>

<script language="JavaScript">
	function toggle(id) {
		var state = document.getElementById(id).style.display;
			if (state == 'block') {
				document.getElementById(id).style.display = 'none';
			} else {
				document.getElementById(id).style.display = 'block';
			}
		}
</script>


</head>

<body>
<div id="main">
	This is not hidden.
	<a href="#" onclick="toggle('hidden');">Toggle Div</a>
</div>

<div id="hidden">This is hidden.</div>


</body>
</html>
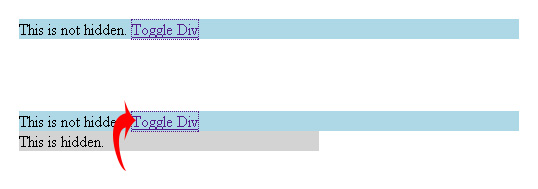
Save the file and test. You should not see the Div when the page loads. When you click the toggle link the hidden box will appear.

Here is an example of something you could use this for. I have a site for deals on clothing. Now if we wanted to add some quality SEO content to help the site rank we could put it in a hidden div so that it doesn’t distract the customer.

When the div is clicked it could expand with SEO rich content and links.

I know the tutorial was pretty basic, but I hope that the example above gives you an idea of how this can be used. I may also expand this into another tutorial and show you how to create a nice menu using the technique.