You should not use this code on a production website.
Warning: This tutorial uses old techniques. It is insecure and will leave your server vulnerable to SQL Injection attacks.This tutorials also uses mysql_ functions that are no longer support. For updated tutorials look for a PDO or MySQLi tutorial.This post will be delete or revised in the future.
This tutorial will walk you through creating a database of categories and then using the categories in the database to create a series of checkboxes. This could be used for forum or board that will allow them to select a category of their story/comment. Let’s begin.
I will be doing all of this code and execution on my local PC thanks to WAMP Server which can be installed by following Installing a WAMP Server. To get started we will need to create our database. To do this, run the following in your SQL editor:
SET SQL_MODE="NO_AUTO_VALUE_ON_ZERO";

CREATE TABLE `tutorial` (
  `CatID` int(3) NOT NULL auto_increment,
  `Category` varchar(100) NOT NULL,
  PRIMARY KEY  (`CatID`)
) ENGINE=InnoDB  DEFAULT CHARSET=latin1 AUTO_INCREMENT=13 ;

INSERT INTO `tutorial` (`CatID`, `Category`) VALUES
(1, 'Cars'),
(2, 'Trucks'),
(3, 'Baseball'),
(4, 'Basketball'),
(5, 'Football'),
(6, 'Houses'),
(7, 'Root Beer'),
(8, 'Gatorade'),
(9, 'Speakers'),
(10, 'Computers'),
(11, 'Databases'),
(12, 'Software');
This will create our table that we will be using for this tutorial. Now we need to create the file that will pull these values to our site and show them in an orderly fashion. Create an index.php in your www root of your WAMP server and open it in your favorite text editor.
<?php

$conn = mysql_connect ("localhost","user_name","password") or die ('cannot connect to database error: '.mysql_error());
mysql_select_db ("tutorial");

$sql = 'select * from `tutorial` order by Category';
$result = mysql_query($sql);

if (!$result) {
    echo "DB Error, could not list customersn";
    echo 'MySQL Error: ' . mysql_error();
    exit;
}
$cats = 1
?>
This first section of the file simply creates the connection to the database and select all the categories from the table named tutorial (which we just created). It sets all the results to the variable of results. Make sure you change the code to have your databases user name and password in the proper locations. If it receives no results it throws an error and displays it to the browser window. The final thing you see is that we created a variable of cats so that we can keep track of how many items have been inserted.
<form name="category" method="post" action="insert.php">

Select your story topic(s)<br /><br />
<table border = "1" cellpadding = "5">
<tr>
Next, we set up our form. Then we create a table so that the items can be aligned properly.
<?php

while ($row = mysql_fetch_row($result))
{
if (($cats / 3) == 1){
	echo "<td align = 'right'>$row[1]:<input type='checkbox' name=$row[1] value=$row[1] /> <br /></td></tr><tr>";
	$cats = 1;
}
else
{
	echo "<td align = 'right'>$row[1]:<input type='checkbox' name=$row[1] value=$row[1] /> <br /></td>";
	$cats++;
}
}

mysql_free_result($result);

?>
This section so to process everything in the brackets of the “while” clause to be executed until $row (the results returned from our query) contains no information. The first line of the while clause checks to see if this is the third category we have entered since we declared cats to be 1. If it is, it echoes the line after it which shows the category in a column and then ends the row and starts a new one. Otherwise, it just puts the value in a new column and leaves the row tag open and increments the variable by one. This way every third category will be placed on a new row. The final line clears the results from the variable.
</tr></table><br /><br />

<input type='submit' value='Insert Comment'>
</form>
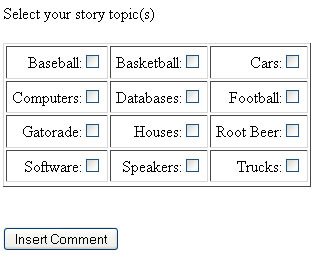
Then we close the final row and end the table. Then we create a couple of breaks and make the submit button to allow the user to submit the values and finally close the form. If you have followed these steps you should get a page similar to this:
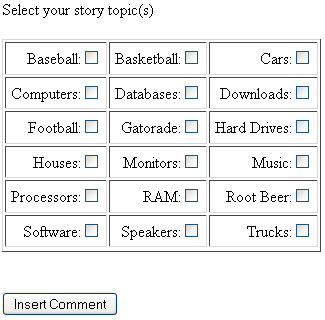
If you go into the database and add more items, or change the items in there the page will automatically show your changes without the need to change the code like below:
This concludes this tutorial. We will continue to take this a step further in the next tutorial. If you have any questions, please leave a comment. I hope this was easy to follow and thanks for reading.

