You should not use this code on a production website.
Warning: This tutorial uses old techniques. It is insecure and will leave your server vulnerable to SQL Injection attacks.This tutorials also uses mysql_ functions that are no longer support. For updated tutorials look for a PDO or MySQLi tutorial.This post will be delete or revised in the future.
In this tutorial I will show you how to display data from a MySQL database on a web page using PHP. This is part two in our MySQL database tutorial. If you haven’t completed the first part of this tutorial you need to do that first. Part 1 is located here: Create a MySQL Database with cPanel and PhpAdmin. When you finish that tutorial, make sure you populate the database with a few entries.
I will be using Macromedia Dreamweaver (Macromedia is now owned by Adobe) to write the code for this tutorial. You can use any plain text editor (such as notepad). This tutorial will be very basic. I hope to build on it later.
First we will need to establish a connection to the database. A nice thing about using cPanel is that it will give you the connection string. Log into your cPanel Administration panel and go to your MySQL databases.
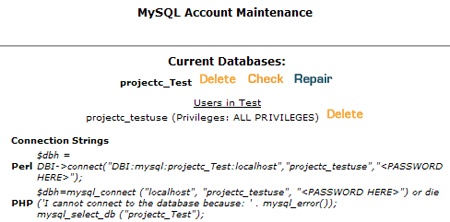
Notice the Connection Strings. We will be using the PHP connection string. Copy everything but the $dbh= from the PHP connection string and paste it into your PHP file. As you can see below, I have already added the basic HTML to the page. Simply paste the code between the open and close PHP tags.
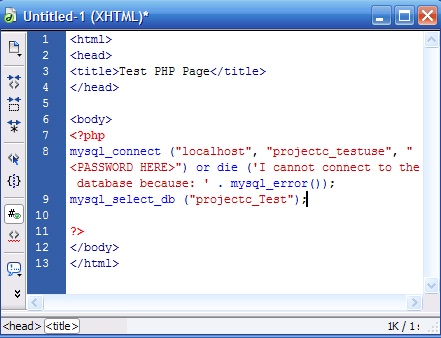
To explain the string a little bit:
Mysql_connect – is a built in function to connect to a database
“localost” – tells the server to connect to the local database
“projectc_testuse” – this is my username for the database (be sure to replace it with yours)
“
Or die – will return an error if we cannt connect to the database.
Mysql_select_db (”projectc_Test”); – select the database for use
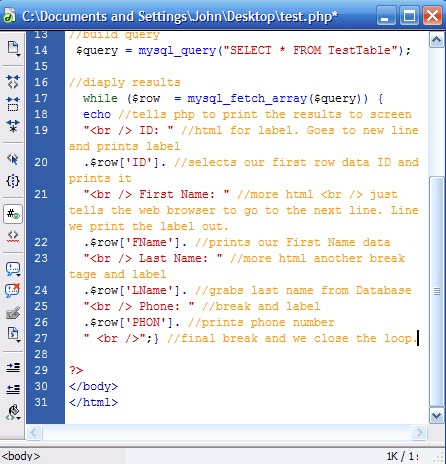
Now that we have a connection to the database, we will need to build our query. We will be selecting everything from the TestTable we created in the previous tutorial. An asterisks (*) is a wildcard character that means all. So our query will look like this (note: I added comments. They will be in orange).
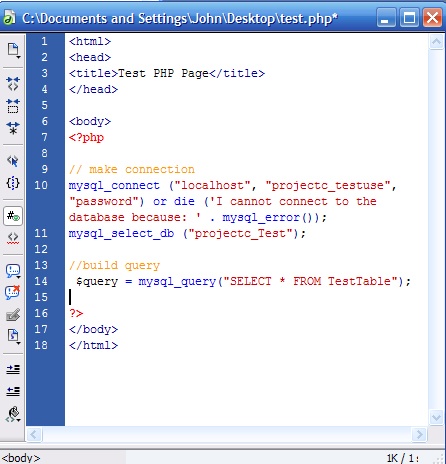
What did we do? We created a variable called query. Then we set the variable to be a MySQL query that will select everything from our TestTable.
Now we need to execute the query and display the results.
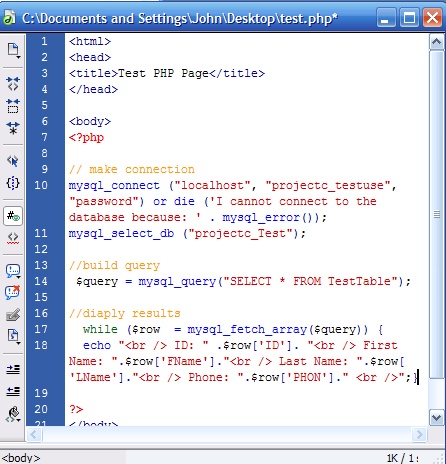
Ok. We are creating an array called $row. Using the mysql_fetch_array function we will execute our query and store it to our array so that we can write the data to the page. Echo will write whatever follows to the page.
I will break it down the echo string a little bit here is what we have (check the comments on each line).
That is it. Save this file with a .php extension. Upload the file to your web server and execute it in your browser. The results should look something like this.

That should give you a basic idea of how to execute a query and display the results. Maybe I will do a tutorial that shows you how to style those results using HTML and CSS. Until then, you guys and girls can play around with this code and see what you come up with. Feel free to make suggestions for future tutorials in the comments.